Selective publish allows you to update individual posts or pages on your site! Perfect for fixing typos or updating content quickly!
There are four places to find the selective publish option:
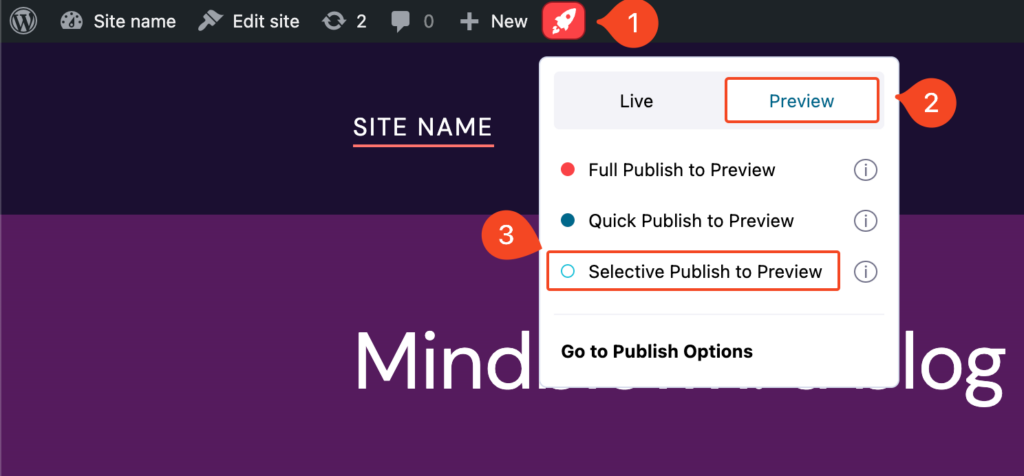
1. In the Elementor Editor: From the Elementor Editor, mouse over the Static Publish button in the side panel, select the Preview or Live environment, and click Selective Publish to….

2. From the WordPress Admin bar: When you’re on a post or a page, mouse over the Static Publish button in the admin bar, select the Preview or Live environment, and click Selective Publish to….

3. From the side panel in the WordPress Block Editor:

4. From the Admin bar side menu: Static Site > Publish Options:
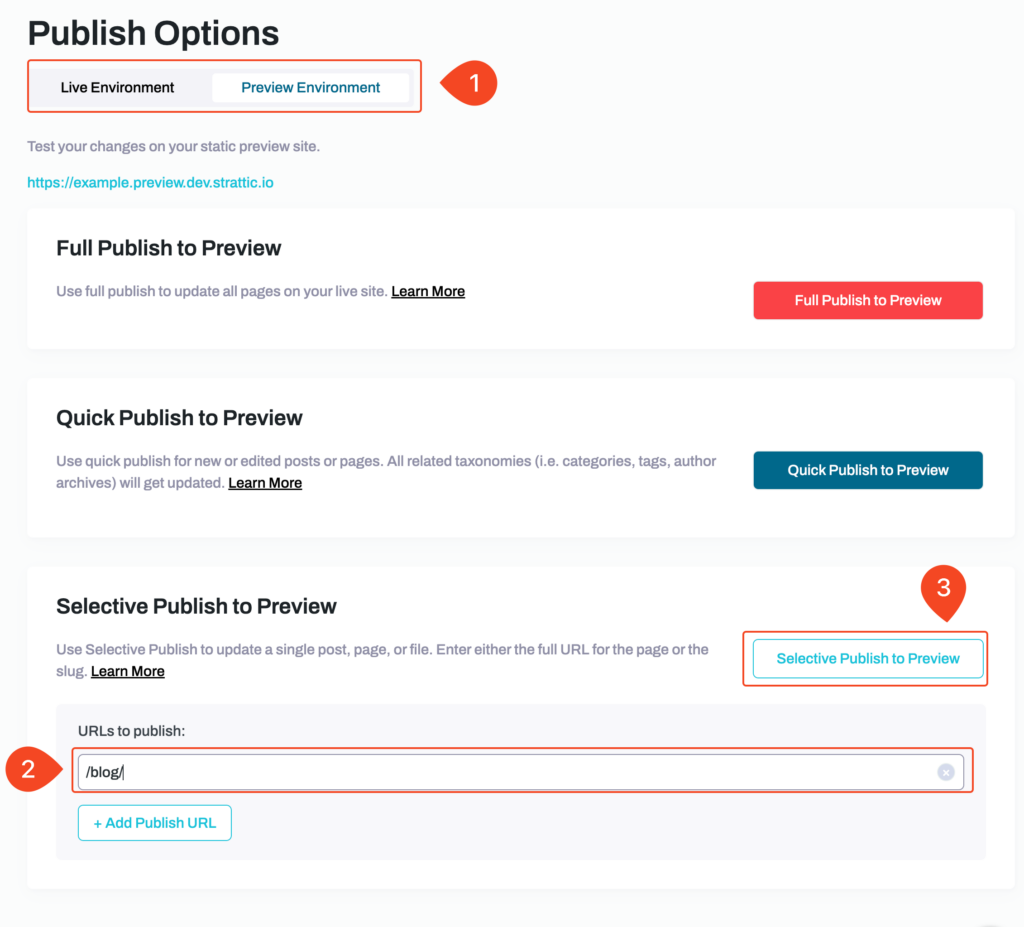
5. You can specify a list of URLs to be published. Navigate to the Publish Options page by going to Static Site > Publish Options in the side menu (or Go to Publish Options from Static Publish button in the admin bar).

6. Select your environment (Preview or Live) and then scroll down to the Selective Publish section.
Here, you can add a list of URLs to be published.
7. All you have to do is enter the relative URLs in the text box and click on the “Add Publish URL” button to add more URLs.
8. Click on the Selective Publish button to publish only those URLs that you listed to your Preview or Live static site.
That’s it! You updated your static site faster than ever! 🎉
How does Selective Publish compare to other publishes?
There are three publishing options, Selective Publish, Quick Publish, and Full Publish. The table below shows what will be published when using each of these options.
Knowing your best publishing option will allow you to publish as quickly as possible.
| Selective | Quick | Full | |
| New Posts | ❌ | ✅ | ✅ |
| Edit existing Posts | ✅ | ✅ | ✅ |
| New or edited Pages | ✅ | ✅ | ✅ |
| Deleting/Trash a page or post | ❌ | ✅ | ✅ |
| Specified File Paths | ✅ | ✅ | ✅ |
| Blog Archive | ❌ | ✅ | ✅ |
| Archives related to new/edited posts (Author, Tag, Category, etc.) | ❌ | ✅ | ✅ |
| Dynamically updated content (Sitemap, RSS Feed) | ❌ | ✅ | ✅ |
| Redirections (via plugin) | ✅ Learn how | ❌ | ✅ |
| Built-in redirection of changed WordPress post permalink slugs. | ❌ | ❌ | ✅ |
| New or edited Elementor Templates | ❌ | ❌ | ✅ |
| Switching Theme | ❌ | ❌ | ✅ |
| Theme Changes | ❌ | ❌ | ✅ |
| Site-Wide Elements (i.e. Header, Menu, Footer, Widgets) | ❌ | ❌ | ✅ |
| Adding/Deleting Plugin | ❌ | ❌ | ✅ |
| Changing Plugin Settings | ❌ | ❌ | ✅ |
| Changing Site Settings | ❌ | ❌ | ✅ |
| Supported Forms: changing form settings (i.e. notifications) | No publish required | No publish required | No publish required |
| Supported Forms: New or Edited Form on one page (i.e. adding a field) | ✅ | ✅ | ✅ |
| Supported Forms: New or Edited Form on multiple pages (i.e. adding a field) | ❌ | ❌ | ✅ |
| Site Migration | ❌ | ❌ | ✅ |
| Adding, editing or removing files via FTP | ❌ | ❌ | ✅ |
FAQ
Will selective publishing affect other pages on the site as well?
If you selectively publish a page, it will also publish any changes in the files used to build it, so things like JS files, CSS files, etc. If those files are used on other pages on your site, then it will change those too.
How do I selective publish a redirect to my static site?
From the WordPress dashboard, go to Static Site > Publish Options, you will need to input the URL that you are redirecting from and click the selective publishbutton.
For example if /this-page/ redirects to /that-page/
Input /this-page/ and then click the selective publish to live/previewbutton.

It is important to mention that if you have not yet published the new page that you are redirecting to (for example: /that-page/), then you should also add that path to the selective publish as well. This will result in both the old page and the new page being published simultaneously.